
Step-by-Step Guide to the GS1 Logistic Label
This guide shows you how to create and print your own GS1 Logistic Labels using Barcode Forge. All you need is the 30-Day Trial version of the software and the template shown on the right (download link).The template contains a typical GS1 Logistic Label in the usual A5 portrait format. The template serves as a foundation and can be extended in content and layout to meet specific requirements.
Install Software, Open Template
After installing the software, open the provided template. The information to be printed on the GS1 Logistic Label is managed in a table in the Data section: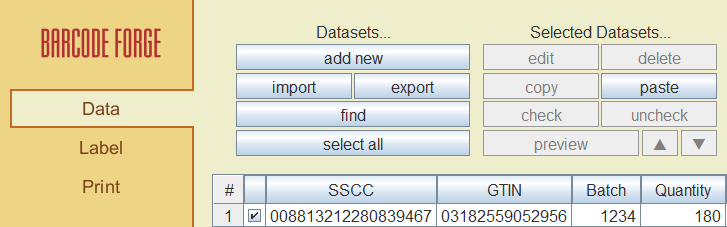 Here you can edit datasets, add new datasets or import datasets from external sources such as Excel. In the Label
section the layout can be edited and in the Print section the ready GS1 Logistic Label can be previewed and
finally printed.
Here you can edit datasets, add new datasets or import datasets from external sources such as Excel. In the Label
section the layout can be edited and in the Print section the ready GS1 Logistic Label can be previewed and
finally printed.
Customizing your GS1 Logistic Label
The following example shows how you can add your own content to your GS1 Logistic Label. We are going to add a "Best Before Date" (BBD) to our template. This information is already encoded in the upper barcode of the template and should also appear as readable text on the GS1 Logistic Label.Right-click on the column header "BBD_YYMMDD" in the table. Select Insert new column to the left from the context menu. Enter "BBD" as the name for the column, then click OK. This creates a new column in the table.
Edit the dataset (e.g., right-click → "edit" or double-click) and enter the date from the "BBD_YYMMDD" column in a human readable format into the "BBD" field, e.g., 2028-08-13. At this point your table should look like this:

The Label section contains the layout for the GS1 Logistic Label. To make the alignment of elements easier, activate the grid right at the beginning and set it to 1.0 × 1.0 mm:
Then use Ctrl + Mouse Wheel to zoom in on the layout to make it more convenient to work with.
Place a new text object for the BBD in the space reserved for it in the template. You can either create a new text object by using the T button or copy and paste an existing text object. For the latter, the adjacent text objects with the contents [~Quantity~] or [~Batch~] are suitable as they already have the correct dimensions and font size.
Open the properties of the new text object (e.g., right-click → "Edit" or double-click), switch to the Text tab, and delete the contents of the input field. Then click on Insert data field and select [~BBD~]. The corresponding area in your GS1 Logistic Label should now look like this:
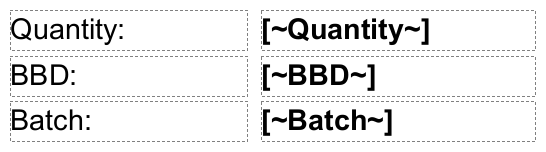
The "Best Before Date" should now be visible as readable text in the preview in the Print section.
Summary: The example above shows how to add textual content to your GS1 Logistic Label. The following sections show how information can be encoded in the barcodes on a GS1 Logistic Label. While there may be some variations, the fundamental principle remains the same: data and layout are linked by placeholders and finally combined into a finished label.
The GS1-128 Barcode
A GS1 Logistic Label always contains one or more barcodes of the type GS1-128. The lowest barcode on the label always encodes at least the 18-digit SSCC (Serial Shipping Container Code). Further information depends on agreements between supply chain partners and is usually encoded in additional GS1-128 barcodes.
Everything about the structure of GS1-128, the correct input of information to be encoded for the barcode, and the check digit within SSCC and GTIN can be found in the detailed chapter on GS1-128.
Generating SSCC Numbers in Series
The SSCC (Serial Shipping Container Code) is a key component of the GS1 Logistic Label. The 18-digit SSCC consists of the following parts:
- Extension Digit: A single digit (0–9) that serves to increase capacity and has no specific meaning.
- GS1 Company Prefix: A unique number assigned to the company by GS1. It identifies the company worldwide.
- Serial Number: A number assigned by the company that is unique for each logistic unit.
- Check Digit: The last digit is a check digit calculated using the Modulo-10 method to detect potential errors during data entry or capture.
 Note: The term "Mod10" refers to the "Modulo 10" method used to calculate the check digit in an SSCC. The same
method is also applied to GTIN and can be used in a similar way in the software.
Note: The term "Mod10" refers to the "Modulo 10" method used to calculate the check digit in an SSCC. The same
method is also applied to GTIN and can be used in a similar way in the software.
The software can also generate sequences of SSCC numbers for you. Click on the Generate Sequence button in the Data section. Enter the first 17 digits of the SSCC in the "From" and "To" fields and adjust the start and end values for the parts with the serial number. Adjust all other settings as shown:
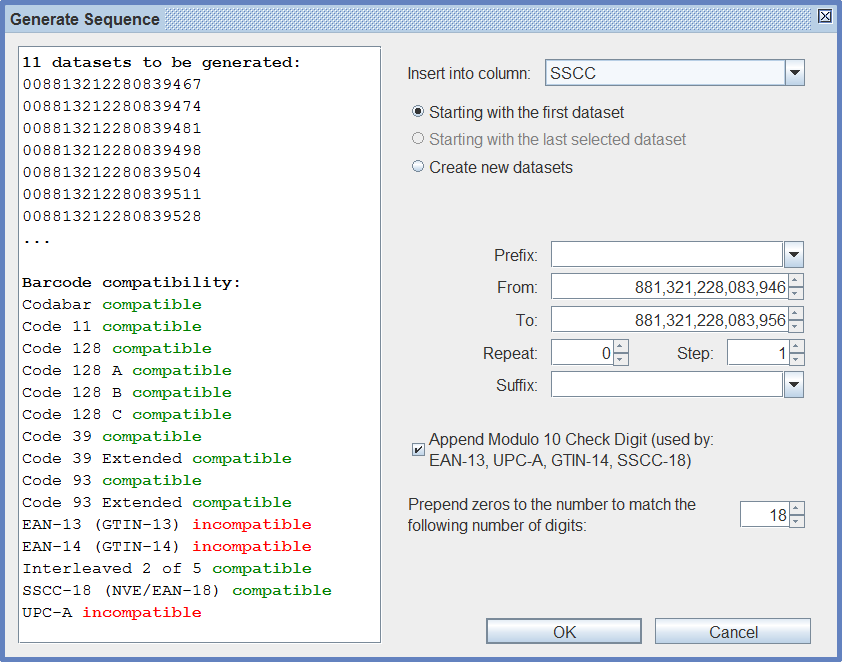
If your SSCC numbers start with "0", please enter "18" for the "Prepend zeros" option, as shown. Appending a check digit will eliminate the need for placeholders in the layout of your GS1 Logistic Label.